Infrastructure & Cloud
Installing Proxmox VE on an HPE ProLiant DL380 Gen9
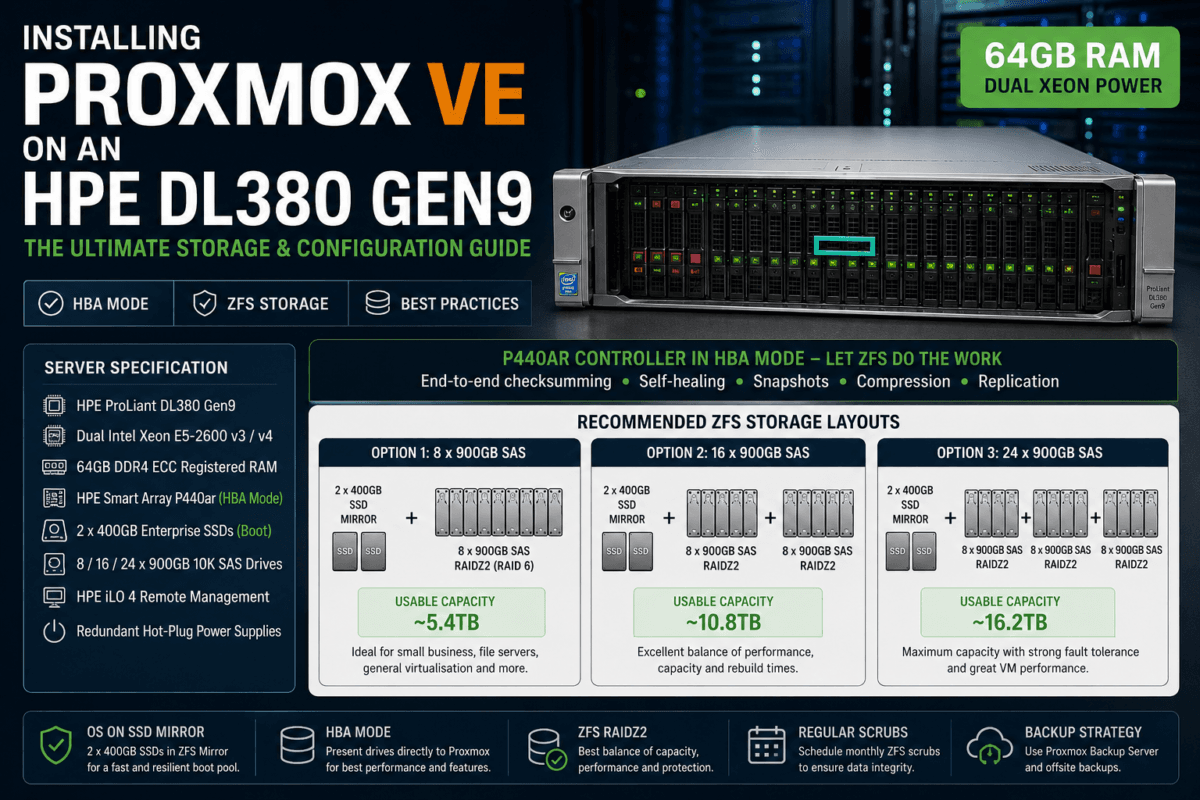
The HPE ProLiant DL380 Gen9 remains one of the most popular enterprise servers available on the UK refurbished hardware market. Despite being several generations old, the DL380 Gen9 continues to offer exceptional performance, reliability and flexibility for organisations looking to deploy virtualisation platforms without the expense of modern enterprise hardware.
Combined with Proxmox Virtual Environment (VE), the DL380 Gen9 provides a powerful and cost-effective platform capable of hosting virtual machines, Linux containers, storage services, development environments and business-critical applications. Whether you’re building a homelab, deploying a small business infrastructure or replacing an ageing VMware environment, Proxmox offers enterprise-grade virtualisation features without costly licensing fees.
In this guide, we’ll walk through the complete process of installing Proxmox VE on an HPE DL380 Gen9 and discuss the optimal storage configurations for systems equipped with:
- Dual Intel Xeon E5-2600 v3 or v4 processors
- 64GB DDR4 ECC Registered Memory
- HPE Smart Array P440ar Controller
- 2 × 400GB Enterprise SSDs for the operating system
- 8, 16 or 24 × 900GB 10K SAS drives for virtual machine storage
We’ll also explain why the Smart Array controller should be configured in HBA mode rather than traditional RAID mode and provide recommended ZFS layouts for maximum reliability and performance.
Hardware Specification
The configuration used throughout this guide consists of:
- HPE ProLiant DL380 Gen9
- Dual Intel Xeon E5-2600 v3 or v4 Processors
- 64GB DDR4 ECC Registered Memory
- HPE Smart Array P440ar Controller
- 2 × 400GB Enterprise SSDs
- 8, 16 or 24 × 900GB 10K SAS Drives
- Redundant Hot-Plug Power Supplies
- HPE iLO 4 Remote Management
Is 64GB RAM Enough for Proxmox?
A common question when purchasing a refurbished DL380 Gen9 is whether 64GB of memory is sufficient for running Proxmox.
For most small business and homelab environments, the answer is yes.
A server equipped with 64GB RAM can comfortably host:
- Active Directory Domain Controllers
- Windows Server virtual machines
- Linux web servers
- Docker containers
- Nextcloud
- Home Assistant
- Monitoring systems such as Grafana and Zabbix
- File servers
- Development and testing environments
- Proxmox Backup Server
Whilst larger deployments may benefit from 128GB, 256GB or more, 64GB provides an excellent starting point and leaves ample room for future expansion.
Why Proxmox VE?
Proxmox VE has become one of the fastest-growing virtualisation platforms in recent years.
Key features include:
- KVM Virtual Machines
- LXC Containers
- ZFS Storage Support
- Software Defined Networking
- Built-In Clustering
- High Availability
- Live Migration
- Integrated Backup Management
- Web-Based Administration
Unlike many competing hypervisors, Proxmox can be deployed without per-socket or per-core licensing fees, making it particularly attractive for organisations seeking to maximise the value of refurbished enterprise hardware.
Why HBA Mode is Better Than Hardware RAID
One of the most important design decisions when deploying Proxmox on a DL380 Gen9 is storage configuration.
Many administrators instinctively configure the P440ar controller in RAID mode. Whilst this approach works, it prevents Proxmox and ZFS from accessing the disks directly.
For modern ZFS-based deployments, the recommended approach is to configure the Smart Array controller in:
HBA Mode
This allows every drive to be presented directly to the operating system.
Benefits include:
End-to-End Checksumming
ZFS verifies every block written to disk and can detect silent corruption that traditional RAID controllers cannot identify.
Self-Healing Storage
If corruption is detected, ZFS can automatically repair damaged blocks using redundant copies stored elsewhere in the pool.
Improved Monitoring
Proxmox can directly access:
- SMART statistics
- Drive temperatures
- Error counters
- Disk health information
Easier Recovery
If a controller fails, ZFS pools can generally be imported into another compatible system without rebuilding proprietary RAID configurations.
Advanced Features
ZFS provides:
- Snapshots
- Compression
- Replication
- Data Scrubbing
- Self-Healing
- Cloning
These features are unavailable or significantly limited when using hardware RAID.
Configuring the P440ar Controller
Before installing Proxmox:
- Enter System Utilities during boot
- Launch Smart Storage Administrator
- Select the P440ar Controller
- Remove any existing RAID arrays
- Enable HBA Mode
- Save the configuration
Once complete, all drives will be presented directly to Proxmox.
Operating System Storage Layout
The operating system should be installed on:
- 2 × 400GB Enterprise SSDs
Configured as:
ZFS Mirror
This is the ZFS equivalent of RAID 1.
Benefits include:
- Boot drive redundancy
- Improved read performance
- Automatic data integrity checking
- SSD failure protection
- Snapshot support
Usable capacity will be approximately:
372GB
This storage pool becomes the Proxmox root pool:
rpoolInstalling Proxmox VE
Download the latest Proxmox VE ISO and create a bootable USB drive.
Boot the server and select:
Install Proxmox VEWhen prompted:
Filesystem
Select:
ZFS (RAID1)using the two 400GB SSDs.
Configure:
- Hostname
- Static IP Address
- Gateway
- DNS Servers
Complete the installation and reboot.
The Proxmox web interface will then be accessible at:
https://your-server-ip:8006Recommended Storage Layouts
The optimal ZFS design depends on the number of installed 900GB SAS drives.
Option 1: 8 × 900GB SAS Drives
Raw Capacity
7.2TBRecommended Layout
8 × 900GB RAIDZ2Equivalent to RAID 6.
Usable Capacity
Approximately:
5.4TBPool Layout
rpool
├── 2 × 400GB SSD Mirror

tank
└── 8 × 900GB RAIDZ2
Recommended For
- Small Business Servers
- Nextcloud
- General Virtualisation
- Windows Server
- Linux Workloads
- File Storage
This layout provides the best balance between capacity, performance and fault tolerance.
Option 2: 16 × 900GB SAS Drives
Raw Capacity
14.4TBRecommended Layout
Create two RAIDZ2 vdevs:
8 × 900GB RAIDZ2
+
8 × 900GB RAIDZ2
Combined into a single ZFS pool.
Usable Capacity
Approximately:
10.8TBPool Layout
rpool
├── SSD Mirror

tank
├── RAIDZ2 VDEV 1
└── RAIDZ2 VDEV 2
Advantages
- Improved IOPS
- Better VM Performance
- Faster Resilvering
- Reduced Risk During Rebuilds
For most DL380 Gen9 deployments, this represents the ideal storage configuration.
Option 3: 24 × 900GB SAS Drives
Raw Capacity
21.6TBRecommended Layout
Create three RAIDZ2 vdevs:
8 × 900GB RAIDZ2
+
8 × 900GB RAIDZ2
+
8 × 900GB RAIDZ2
Usable Capacity
Approximately:
16.2TBPool Layout
rpool
├── SSD Mirror

tank
├── RAIDZ2 VDEV 1
├── RAIDZ2 VDEV 2
└── RAIDZ2 VDEV 3
Advantages
- Excellent Capacity
- Strong Fault Tolerance
- Good VM Performance
- Manageable Rebuild Times
This layout is generally preferred over a single 24-drive RAIDZ2 vdev because it delivers significantly better performance for virtualisation workloads.
Creating the ZFS Storage Pools
Before creating your storage pool, identify your drives:
ls -l /dev/disk/by-id/Always use the disk IDs rather than /dev/sdX names, as Linux device names can change after reboots.
Creating an 8 Drive RAIDZ2 Pool
zpool create -o ashift=12 \
tank raidz2 \
disk1 disk2 disk3 disk4 disk5 disk6 disk7 disk8
Enable compression:
zfs set compression=lz4 tankVerify:
zpool status
zfs list
Creating a 16 Drive Pool
zpool create -o ashift=12 \
tank \
raidz2 disk1 disk2 disk3 disk4 disk5 disk6 disk7 disk8 \
raidz2 disk9 disk10 disk11 disk12 disk13 disk14 disk15 disk16
Enable compression:
zfs set compression=lz4 tankCreating a 24 Drive Pool
zpool create -o ashift=12 \
tank \
raidz2 disk1 disk2 disk3 disk4 disk5 disk6 disk7 disk8 \
raidz2 disk9 disk10 disk11 disk12 disk13 disk14 disk15 disk16 \
raidz2 disk17 disk18 disk19 disk20 disk21 disk22 disk23 disk24
Enable compression:
zfs set compression=lz4 tankVerify:
zpool statusCreating Datasets for Virtual Machines, ISOs and Backups
Once the pool has been created, create dedicated datasets:
zfs create tank/vmdata
zfs create tank/iso
zfs create tank/backups
Enable compression:
zfs set compression=lz4 tank/vmdata
zfs set compression=lz4 tank/iso
zfs set compression=lz4 tank/backups
Verify:
zfs listExpected output:
tank
tank/vmdata
tank/iso
tank/backups
Adding ZFS Storage to Proxmox
Navigate to:
Datacenter → Storage → Add → ZFSConfigure:
ID: tank-vmdata
Pool: tank
Content Types:
- Disk Image
- Container
- Snippets
Click Add.
Creating ISO Storage
To upload operating system installation media, create a dedicated ISO directory.
Create the directory:
mkdir -p /tank/isoIn the Proxmox interface navigate to:
Datacenter → Storage → Add → DirectoryConfigure:
ID: ISO-Storage
Directory: /tank/iso
Content:
- ISO Images
- Container Templates
Click Add.
You can now upload:
- Windows Server ISO files
- Ubuntu ISO files
- Debian ISO files
- Rocky Linux ISO files
- Proxmox Backup Server ISO files
through:
Datacenter → ISO-Storage → ISO Images → UploadZFS Optimisation
Enable compression:
zfs set compression=lz4 tankRecommended record sizes:
For virtual machines:
zfs set recordsize=16K tank/vmdataFor file storage:
zfs set recordsize=128K tank/filesRecommended Final Layout
rpool
├── Proxmox Operating System

tank
├── vmdata
├── iso
└── backups
This layout separates operating system files from virtual machine storage, installation media and backups, making administration simpler and improving long-term scalability.
Backup Strategy
Even with ZFS redundancy, backups remain essential.
Remember:
RAID is not a backup.
Recommended approach:
- Deploy Proxmox Backup Server
- Store backups on a dedicated dataset
- Maintain an off-site copy of critical backups
- Schedule regular backup verification tests
A proper backup strategy protects against hardware failures, accidental deletion, ransomware and site-wide disasters.
Why Not Use One Large RAIDZ2?
A common mistake is creating:
24 × 900GB RAIDZ2Whilst technically possible, it is not recommended.
Drawbacks include:
- Reduced IOPS
- Longer rebuild times
- Increased risk during resilvering
- Larger failure domains
Multiple 8-disk RAIDZ2 vdevs provide substantially better performance and resilience.
Power Consumption Considerations
Many refurbished DL380 Gen9 servers are sold with 900GB 10K SAS drives.
Whilst these drives remain reliable, they consume considerably more power than modern SSDs.
A fully populated 24-bay chassis can consume significantly more electricity than an SSD-based equivalent and will generate additional heat and noise.
For organisations where performance and efficiency are priorities, enterprise SSDs can provide:
- Lower power consumption
- Reduced cooling requirements
- Faster virtual machine performance
- Lower latency
- Improved responsiveness
Final Thoughts
The HPE ProLiant DL380 Gen9 remains an outstanding platform for running Proxmox VE. By configuring the P440ar controller in HBA mode and deploying ZFS directly on the underlying disks, administrators gain access to enterprise-grade storage features including end-to-end data integrity, snapshots, replication and self-healing storage.
For the best results:
- Install Proxmox on a mirrored pair of 400GB SSDs
- Use HBA mode rather than hardware RAID
- Configure data drives as multiple 8-disk RAIDZ2 vdevs
- Enable compression
- Schedule regular ZFS scrubs
- Implement a robust backup strategy
Following these recommendations will provide a highly resilient, cost-effective and performant virtualisation platform capable of supporting business and homelab workloads for many years to come.
